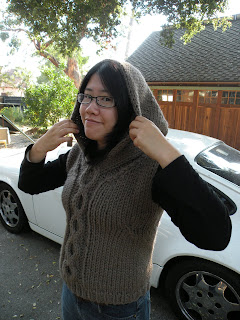


Basically, it is a vest knit from the bottom to top in circular needles, to save time. Also, to avoid the potential thick seams that might result from joining chunky yarns together. In the pictures, I tried to do some decrease to ‘shape the waist’, but it turn out not that successful. Therefore, I did not include that in the pattern.
Chest: 36 inches
Length: 22 inches (from shoulder to bottom, not including hoodie)
Materials
Lion Brand Wool Ease Thick and Quick – Taupe; 4 skeins
1) 1
2) 1
3) Stitch markers
4) Stitch holders
5) Yarn needle
To Set up…
Use needle #13 to CO 76
Row 1 – k1, p1 – establish 1x1 rib
Repeat single rib for another 5 rows (totally 6 rows)
Row 7 – change to needle #17, [*k1, pl, repeat * 9 times, k1, inc 1], rep [] 4 times – 80 sts, ready for the body and cable set up.
Cable set up
| | Forming the front | Forming the back |
| Rnd 1 | k14, p2, k8, p2, k14, (pm) | k6, p2, k4, p2, k12, p2, k4, p2, k6, (pm) |
| Rnd 2 | as rnd 1 | |
| Rnd 3 | k14, p2, C4F, C4B, p2, k14 | k6, p2, C4F, p2, k12, p2, C4B, p2, k6 |
| Rnd 4 | as rnd 1 | |
| Rnd 5 | as rnd 1 | |
| Rnd 6 | as rnd 1 | |
| Rnd 7 | k14, p2, C4B, C4F, p2, k14 | k6, p2, C4F, p2, k12, p2, C4B, p2, k6 |
| Rnd 8 | as rnd 1 | |
Repeat Rnd 1-8, until there are 5 honeycomb formed.
Prepare for neck shaping, place the back 40 sts between two markers on stitch holder.
With the front 40 sts on the needle, prepare to work on neck shaping as follow.
From now on, the piece will work in back and forth.
Right front Neck Shaping
Row 1 (RS): K14, p2, k4 turn (leaving rem stst on needle)
Row 2 (WS): p4, k2, purl rem sts
Row 3 : (dec row) knit to last 8 sts, k2tog, p2, k4
Rep row 2 and 3 until 12 sts remain, ending with row 2. Then work even, keeping sts in patt as set. Until front measure 21.5’ from cast-on edge, ending with a wrong-side row
Shape Shoulder:
(RS) keeping patt correct, bind off 6 sts at beg of next row.
(WS) Work 1 row
bind off rem 12 sts.
Left front Neck Shaping
Joint new yarn, work on the 20 sts that was left on the needle
Row 1(RS): k4, p2, k14
Row 2(WS): purl to last 6 sts, k2, p4
Row 3: (dec row) k4, p2, slip 1 as to knit, k1, psso, knit rem sts
Rep row 2 and 3 until 12 sts remain, ending with row 2. Then work even. Keeping sts in patt as set. Until front measure 21.5’ from cast-on edge, ending with a right-side row.
Shape Shoulder: same above
Back Shaping
With RS facing, return to rem 40 sts still on needle. Rejoin yarn, and starting with a knit row. Work back and forth in rows in as patt established until back measures same as front to shoulder shaping, ending with a purl row.
Shape Shoulder: continuing sts in pattern, bind off 6 at the beginning of next 2 rows. Bind off 8 sts at the beginning of next 2 rows. Keep the remaining 12 sts on stitch holder.
Joint shoulder seam. The body of vest is done.
Hoodie:
With right side facing and circular needle, pick up knit 26 sts along side of neck evenly from the middle, knit 12 sts from the stitch holder, pick up another 26 sts along the reside of side of neck.
Work in stockinette sts until hood measure 11 inches from beginning.
Keep sts on needle, use Grafting/Weaving/Kitchener Stitch to joint two side horizontally without seam. (check here for video demo of Grafting)


1 comment:
This is so nice! I want to make one.
Post a Comment